News items
The Wheel of Time costume exhibition at Prague's Galerie Manes showcases over 80 breathtaking costumes, offering an unprecedented look at the intricate craftsmanship behind the show.
Read More...
Welcome back to the "Forum Roundup." I'll briefly cover the big news!!! The Wheel of Time television show is moving forward, slowly, but surely. Sony will serve as the production studio! The news was released right before JordanCon 9. Robert Jordan left us with many thought provoking quotes. "In war, boys, fools kill other fools for foolish causes." I'm curious if this view originated from his own experience in Viet Nam. I previously covered Robert Jordan's military service and decorations. I'd rather picture him in his "carriage house" writing his books. Our own Jason Denzel described the carriage house as having "at least several hundred bladed weapons. Swords, axes, spears, and knives of all shapes and sizes line the walls and shelves of his office." Jason shared a picture with us. As you can imagine, the news of the television series has set off excitement and speculation at Dragonmount's Social Groups. The White Tower has multiple threads on suggestions for The Wheel of Time casting. It's loads of fun sharing our thoughts on who should play various characters in the books. The Dragon Reborn Role Play has seen a surge in activity and characters. The Band of the Red Hand has been focusing on music. The General Wheel of Time Discussion has been visited by members who are in the midst of reading the series for the first time! Can you remember when you picked up Eye of the World? JordanCon 9 took place April 21st to April 23rd 2017 in Atlanta Georgia. It was held at the Atlanta Marriott Perimeter Center. The author guest of honor was Charles E. Gannon and the artist guest of honor was Stephen Hickman. A recap of JordanCon 9 along with details and pictures can be found at the blog of Chez Lannis here. JordanCon 10 will be held April 20th to April 22nd in Atlanta, Georgia. Our very own Jason Denzel will be the author guest of honor and the artist guest of honor will be Stephanie Law. You can find information on JordanCon 10 at their Facebook group here. See you next month!

Welcome back to another edition of Fandom Flair. This time, I want to show you some easy (and one not-so-easy) way to do casual cosplay for Wheel of Time characters. For those who don't know, cosplay is when a person dresses up as a specific character. These costumes can be super elaborate, as I'm sure you've all seen from conventions like the San Diego Comicon, or even our own Jordancon. Casual cosplay, however, tones it down just a bit. It's normal clothes that you can wear in public but is still based on the ideas or themes of a specific character. I love to casual cosplay at work! Most of the time, no one can tell I'm wearing something special. So, for Wheel of Time characters this can be pretty easy. I have two cosplay outfits that were put together pretty effortlessly. Let's talk about those first. Aviendha I love Aviendha, and the Aiel in general. Their culture is one of the most fascinating in all of Randland. And Aviendha is a strong, capable, but still stubborn, woman. I love how unbreakable she is! Putting together an Aviendha outfit was the simplest of the bunch. I based it off her Wise One outfit, choosing a brown, bulky skirt and pairing it with a white shirt. Though Wise Ones shouldn't wear one, I did have a black scarf to be my shoufa. For accessories, I switched Aviendha’s bracelet and necklace. I wore “snowflakes” around my wrist, and a flower (substitute for ivory rose) necklace. I also have super adorable turtle earrings that remind me of the turtle brooch angreal Aviendha borrowed from Elayne. Mat There could be better ways to cosplay Mat, but I put this together with clothing I already had. I would rather have a military-esque coat to give more allusion to Mat’s purpose in the novels, but, whatever works. I started with just jeans and a black shirt. I wore a green cardigan over, and added a black scarf to cover the hanging wound. Lastly, I wore boots. I wish I could have had lace or maybe even a pink scarf. For a final touch, I added dice to a hair clip. For this, I bought a five pack of dice and had an adult drill through the center with a very small drill it. The hole is only about 5mm. I slipped a thin, metal wire through the hole and twisted the wire to fasten it to the clip. I have five dice total, but could only incorporate two. I'll keep thinking of a clever use for the other three. Rand This one took some thought. I wanted something grand for the Dragon Reborn, so I modeled this off Paul Bielaczyc’s amazing Rand cosplay. I started with a crimson shirt. Next, I found gold iron-on fabric at Joann Fabrics. It was about $5 for one sheet of the metallic material. I only used one sheet, so not a bad price. First: the dragons. One major characteristic of Rand is his Dragon tattoos. I printed out a copy of the Dragon from the chapter heading onto cardstock. I cut it out, then traced it on the back of the gold fabric. Then, I flipped it and traced it facing the opposite direction. I needed two because, “Once the Dragon, for remembrance lost. Twice the Dragon, for the price he must pay.” (The Great Hunt, Chapter 26, “Discord”) After that, I decided to add swirls to the neckline of my shirt. I drew two different swirl patterns and traced them, reversing one a few times so it would go in opposite directions. I cut out all the gold pieces then played with positioning. Once I had it right, I ironed them in place. For the outfit, I paired the shirt with a black skirt, a headband with golden leaves, and my Aes Sedai necklace and Great Serpent ring, since Rand is an Aes Sedai after all. It wasn't a difficult project, but it was a lot more time consuming than the others! That's all for this week. Let me know who you like to cosplay as! Thanks for reading!

Variety and IGN announced today that the long-awaited TV show adaptation of The Eye of The World has finally landed at a production studio with a named writer and executive producer. Rafe Judkins, perhaps best known for his work on Marvel's Agents of SHIELD, will be the lead writer and executive producer. The other executive producers named in the articles are Ted Field, Mike Weber, Darren Lemke, Rick Selvage, Larry Mondragon, and Harriet McDougal. Sony Pictures will serve as the production studio along with Red Eagle Entertainment and Radar Pictures. These announcements come a day before the annual JordanCon convention, where fans are gathering in Atlanta. The timing seems fitting, since we learned about the intentions of a Wheel of Time based television series at last year's convention, during a panel in which Harriet teased an announcement coming "very soon." IGN also have a quick recap of the Wheel of Time's plot, which is worth a watch as well. It's important to note that although this is a positive step forward for the show, no timeframe or distribution network has been announced. Details are sparse, but it seems as though the show is still in the very early stages of development. We will post more as we learn it. We have very high hopes that this will be the amazing product we've all been waiting for.

Welcome, everyone, to the latest edition of the Forum Roundup where I cover the monthly events at Dragonmount. First, I'd like to provide you with a bit of information about Robert Jordan, of which many of you might be unaware. Robert Jordan served two tours in Vietnam as a helicopter gunner. He was awarded the Distinguished Flying Cross with bronze oak leaf cluster, the Bronze Star with "V" and bronze oak leaf cluster, and two Vietnamese Gallantry Crosses with palm. It has been said that he always had a great deal of appreciation and respect for those men and women willing to serve. On to Dragonmount. The Warders have welcomed home those who have been away for a while. It was a very pleasant surprise to see them arrive. The General Discussion has been bustling with conversation from new members of Dragonmount, some of whom have just finished the series and others are in the process of reading. There have been staff changes in the White Tower with members stepping up to new leadership positions. We thank those who have served and will continue to enjoy their company within their Ajahs and the Tower as a whole. The Black Tower has been hosting many active threads including a place for Star Wars fans! The Band of the Red Hand has been busy with a carnival. The Ogier are placing memories on their "Memory Tree" and sharing what they would love to have in their dream homes. Shayol Ghul (as usual) is busy with evil, this time a "something" or "someone" evil game. See you next month!

Welcome back to another edition of "Fandom Flair." For this project, I wanted to try to decorate some shoes to be Aes Sedai (or White Tower) shoes. This was pretty easy, just tedious. I don't know about you, but I get bored by repetitive activities, and this got very repetitive. But, it's a cheap way to show off some Aes Sedai love. First, I bought a pair of white, canvas shoes. I think I got them from Wal-Mart, and they were about $5. Next, I bought a pack of Sharpie markers, making sure I had all the colors of the Ajahs (Blue, Green, Yellow, Red, Gray, White, and Brown). I started by measuring the front face of the shoe. I took that measurement and divided it by seven, giving me a little section for each of the seven colors. Next, I continued adding that measurement to the sides of the shoes. When I got to the back, I had a big chunk left over. My symmetrical-thinking mind wouldn't allow it to be less than perfect for the color scheme, so I decided to do the colors again, but aligned vertically. Not sure this was the best option, but it was the only one I was capable of doing. Finally, I sketched a flame into the center to leave white. Then, I outlined everything in black and colored in each space with the designated Ajah color. As I said, super easy, but really boring. I didn't have enough room to outline the back so the colors look very smeared. The front got a bit smeared, too. But I'm still pleased with the outcome! Next time, I want to show you some easy ways to casual cosplay as Wheel of Time characters. Thanks for reading!

For those of you that participate, I hope you had a wonderful Valentine's Day! I'm out here in California hoping we don't float away. It's either drought or floods! Before I cover the monthly goings on at Dragonmount, I'd like to start with Robert Jordan. He is a graduate of The Citadel, a military college in South Carolina and he earned a degree in physics. For those of you who feel trapped by your field of study, this demonstrates that we don't always end up from whence we came. The Citadel even has its very own tribute to Robert Jordan. It contains one of his hats, his cane, a heron marked sword, Wheel of Time books, and other things donated by Harriet McDougal, his wife. Let's take a look at the Black Tower. They are discussing their favorite fantasy merchandise. I'd have to say that mine is the Green Aes Sedai Shawl I purchased but this topic is not limited to the Wheel of Time. Shayol Ghul is working on their very own horror story. That is not surprising when we consider its point of origin! The Dragon Reborn Role Play has welcomed some new characters and looks forward to their development. The Ogier is considering what belongs in your very own dream home. The White Tower and Warders has a new character collage by M'Lady La Fleur and it is one to chill your heart! This character is also up for discussion on which actress should play her in the television series. The White Tower also hosted "Chocolate Week" and the Aspirant Common Room is hosting some new members. The Kin is on the lookout for new movies in 2017. I've already seen some good ones! See you next month!

I hope everyone at Dragonmount celebrated the holidays and welcomed in the New Year with hopes and dreams. Nevermind resolutions! Many of us have holidays that are rooted in religious traditions. I found something I thought quite interesting about Robert Jordan. This comes from an overview written by our own Jason Denzel about his time spent with Mr. Jordan during the San Diego ComiCon in 2004. Members have been busy at Dragonmount's Social Groups engaging in a multitude of activities. The White Tower and Warders have been occupied with the White Ajah's Wheel of Time Winter's Carnival! The Warders are discussing New Year's resolutions and playing games. Plus there was a raising! The Kin are critiquing movies and discussing our weekends. The Ogier are busy adding to their "Memory Tree." The Wolfkin are having "Healer's" discussions and games. The Band of the Red Hand has discussed "Christmas Markets" throughout the world and have put up their "Matrims Nominations for 2017." The Black Tower has hosted a discussion on 2016 and "Goals." The Aiel had both light-hearted and serious activities: "The Book Game, Weird Cultural Oddities, and Prison Systems." Wishing a prosperous and busy New Year for Dragonmount and all of its members.

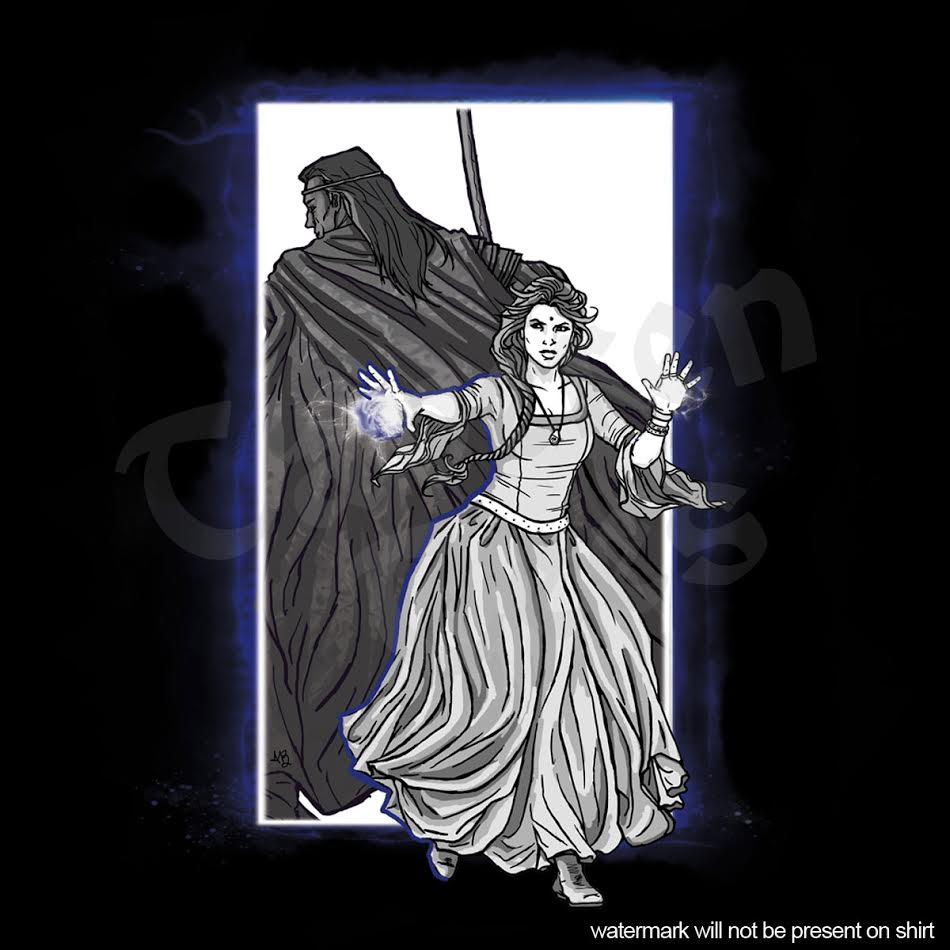
Nynaeve and Lan can forever guard each other's backs - and yours - with the newest tee shirt design now available for preorder from Ta'veren Tees, www.TheWheelofTimeStore.com. "The Gateway," illustrated by Ariel Burgess, shows Lan and Nynaeve Traveling via gateway, standing ready to fight and protect each other. The front features Lan coolly guarding Nynaeve's back, while the back of the shirt features Nynaeve ready to unleash her fury on any darkfriend foolish enough to attack. "The Gateway" is available in an unisex tee and a ladies' style tee. Both are soft, comfortable 100% cotton shirts. Sizing information is available on the product pages. Preorders receive a discount and will ship on February 10, as soon as the shirt is in stock. All items ordered alongside the new shirt will be held and shipped at the same time. Unisex: TaverenTees.com/gateway Ladies: TaverenTees.com/gatewayladies

Americans are looking forward to their Thanksgiving holiday, others are experiencing inclement weather, and some are even going into summer! Dragonmount has members from all over the world. More Robert Jordan trivia. Apparently he was quite the outdoorsman and enjoyed fishing. Dragonmount has always been important to me not only for the members and activities, but as a place to remember and honor Robert Jordan and his books. The White Tower is busy with Thanksgiving events and celebrating members' birthdays. The Black Tower has welcomed back some old members who have returned, have several active games, and are tempting members with brownies. The Band of the Red Hand celebrated Halloween in a big way and have also had old members return and new ones join! Shayol Ghul is writing their own "Adventure" story and updating the Wiki. They have also welcomed back a returned member. The Wolfkin are engaging in a "Healer's Discussion" and the Aiel hosted Veteran's Day Activities. The Structured General Wheel of Time discussion is still going strong. We are all awaiting word on the TV series. Nothing yet. Can't wait!!! For the time being, we can experience the Wheel of Time world right here. See you next month!

Upcoming from Tor, a new Wheel of Time eBook bundle! This new set, available December 13, 2016, will include the first four books of the series. It's the perfect introduction for someone who hasn't started the series, or a great addition for someone who is looking to expand their Wheel of Time collection. You can preorder it on Amazon, and it will also be available in the Dragonmount eBook store. The bundle will include high quality versions of the original cover art. Though there are not plans at this time to make the rest of the series purchasable through a bundle, it is likely to happen. Are the first four novels not enough? A complete series bundle is already available, here. It only includes books 1-14, and does not include New Spring.

Fall is finally here! Some of you are experiencing a gentle cooling while others are experiencing inclement weather. Halloween is almost upon us and whether you have children or enjoy cosplay, this can be an extra special time of the year. While continuing my “search” for Robert Jordan, I found this bit of trivia: “He had a secretary whose main job was to keep the facts straight in the elaborate world he created that spanned 11 books and almost 7,420 pages. Some critics questioned his wordiness, yet he could sum up the series' driving force in three words: 'Life changes. Deal.'" (From the obituary of James Oliver Rigney Jr., Los Angeles Times) Many of us would have cherished that job. I know I would have. We have been introduced to new readers of the series and it is touching to hear their thoughts and wonder about a world we have all inhabited for quite some time. Vicariously, we can pick up the series anew and remember our own journeys through The Wheel of Time. The Kin is flourishing in its new location, The White Tower and Warders. The Kin is a relaxing place where we build friendships and engage in fun activities. The Band of the Red Hand is offering multiple threads for Halloween! Debates and Discussions are heating up as we near the American election. The plus side is that members can post their own views and read those of others, some who reside outside of the United States. The Black Tower is getting into an election mode, with sign-ups for a Trump vs Clinton 2016 Mafia game. M’Lady Lefluer is at it again posting a beautiful collage that features Nynaeve. Shayol Ghul is seeking a new Cuen’Shaidar. Do you have what it takes? See you all next month!


